With iOS/iPadOS 16.1 and macOS Ventura, you can set up a separate iCloud Photo Library and share it with friends and family to view, edit, and add photos.
Apple Family Sharing lets you share photos and videos taken with your iPhone. Create shared albums and invite others to view your latest photos. However, the process is not always smooth, so Apple now introduces iCloud Shared Photo Library with iOS 16.1 and macOS Ventura.
For this shared photo library to work, use your iPhone, iPad, or Mac to create a special photo library in iCloud for sharing purposes only. You can then decide which photos to go to your public library and which to keep in your personal library. Share all or select specific photos. You can also share new photos automatically.
Shared Photo Library allows you to share your Snaps with up to 5 other people. You will see the option to share a group photo with everyone in your shared library. Once shared, shared items will appear in everyone’s Apps for easy access. Other members can view, edit, like, and remove photos and videos in the shared library, and they can add their own photos and videos.
Enable iCloud Photos
To set up a shared iCloud Photo Library, you and everyone you want to invite must be running iOS/iPadOS 16.1 or macOS Ventura. To update your iPhone or iPad, go to Settings > General > Software Update. On your Mac, open the Apple icon, choose About This Mac > Software Update, and click Update Now.
If you are not already using iCloud Photos, you should enable this option. On your iPhone or iPad, go to Settings, find your name, then go to iCloud > Photos. Turn on the Sync iPhone toggle to give your device time to sync your photos. The people you invite must also use iCloud Photos.
If you’re using a Mac, open System Preferences and select your Apple ID. Go to iCloud and turn on the switch next to Photos.
Create a shared photo library
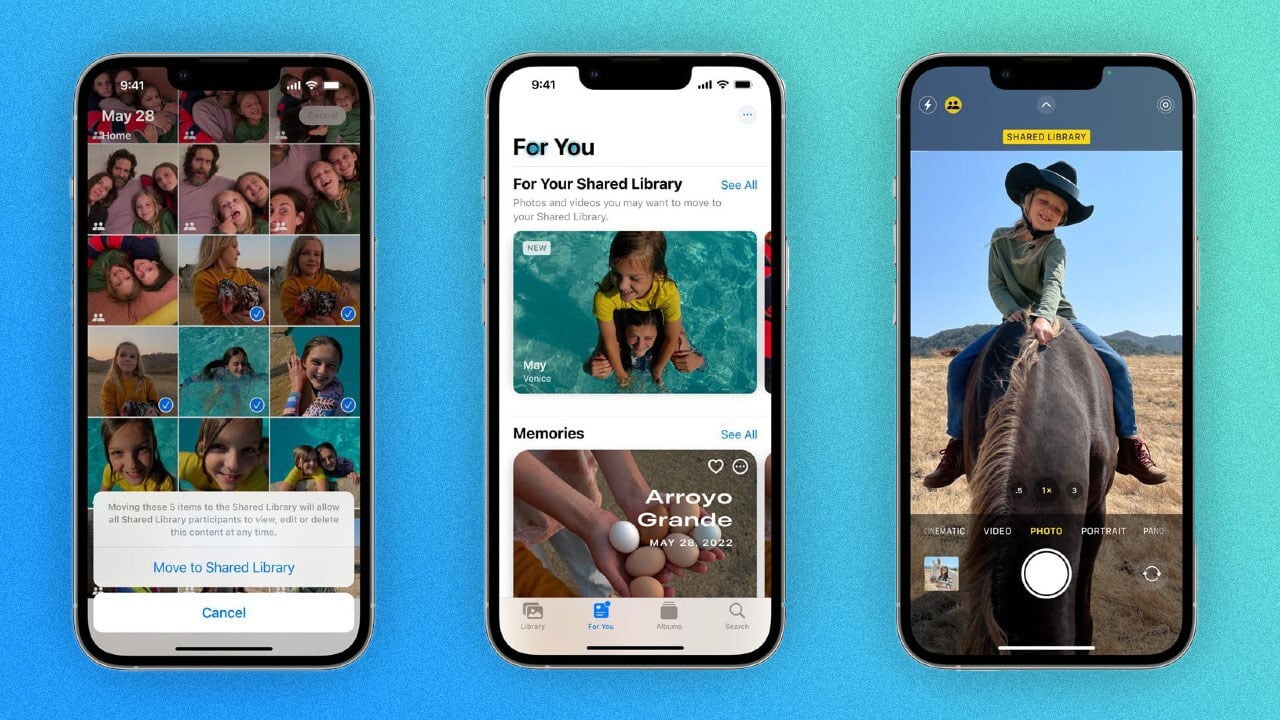
To make a shared library on your iPhone or iPad, go to Settings > Photos. Select Shared Library and click the Start button. Select Add Member to add people to your library. Put the name, email address or phone number of the person you want to add.
You can also click the + sign to find your contacts and select people from this list. Review the invited members and click Add when you’re ready to continue. Review the list of users on the Add Member screen and click Next.
Next, you will be asked to select the photos you want to transfer to your shared library. You can transfer all photos and videos selected by date or person or select manually. Selecting “All Photos & Videos” will take you to the next screen.
If you choose people or history, you will be asked if you want to add previous photos with the invited member. Next, you need to list specific people in your photo library and choose a date to start publishing their photos.
If you choose the manual option, you will be given the option to select individual photos. Tap the photo you want to share, then tap Add. You can also click Albums at the top to share from a specific album. Select an album, then select the photos in the album you want to share. Click Add when you’re done.
To create a shared photo library on your Mac, open the Photos app and click the Shared Albums Next + icon. Enter a name for the shared album, then enter the names or email addresses of the people you want to invite, then click Create.
Drag and drop the photos you want to share into the library you’ve created. Select Shared Library to view internal images. You can remove photos from the album by right-clicking on the item and selecting Remove from Shared Album.
To switch between different libraries, click the Library button at the top of the screen and select Personal Library, Shared Library, or All Libraries. Pull the scroll bar up to zoom in or out on the photo. Click the Filter menu on the right to filter your view by photos, videos or other objects.
Review the shared library
After selecting a photo, you can preview your library before sharing. Tap the Shared Library Preview button to see what your library will look like. If you don’t want to take the photos to your personal library and share them, tap the Select button at the top, select the photo, then tap Go to Personal Library at the lower side of the screen.
You can view personal and shared libraries on the preview screen. Tap the contact icon in the top right corner of the screen and select Personal Library. You can then select additional images that you want to transfer from one library to another.
From the Preview screen menu, you can switch between personal and shared libraries or view both libraries together. You can also change the look and layout of a personal or shared library. Tap the person icon and select Zoom in for a closer view or Zoom out for a wider view.
Select the aspect ratio grid to convert the image between the square grid and its original aspect ratio. Select a filter to display specific photos and videos based on the filter only. Select Show Map to see the location of each geotagged photo. When done, tap Continue.
Invite attendees
You added users to the shared library before, but now you need to give them access. You can send invitations from the Messages app by selecting Invite via Message. Or tap Share Link to create a shareable link to send to people.
Next, tap Auto Share to automatically share photos when attendees are nearby, or choose Share manually to tell iCloud when to share photos. A message appears indicating that the shared library is ready. Tap done.
Anyone with access to the shared library can copy, share, select or delete photos. Long press the image and choose one of the following options from the menu: To edit a photo, tap Photo, then tap the Edit link at the top. Each participant can then adjust exposure, contrast, brightness and other aspects of the image.
Manage shared libraries
Owners of shared libraries can be managed in Settings > Photos > Shared Libraries. You can add or delete participants, get instructions for adding photos, automatically share a selection from your camera roll, and delete shared libraries.